
How Should You Care for Pepper Seedlings After Sprouting?
Pepper seedling care changes the moment a shoot breaks the mix. Move each emerged cell out of the humid germination setup, give it strong overhead light with a nightly dark period, and water the root plug only when its surface is nearly dry.
Compact stems, expanding true leaves, a firm stem base, and roots that hold the plug show that the setup is working. Stretching, constantly wet mix, collapsing stems, or cells that dry much faster than before each point to a different correction.
What should you change as soon as pepper seedlings emerge?
Move an emerged pepper seedling into bright overhead light and uncover it as soon as the shoot stands above the mix.
Do not wait for every cell in the tray because the first seedlings can stretch while later seeds still need germination conditions.
Emergence changes the plant from a seed using stored energy into a green seedling that must capture light. The humidity dome and warm germination mat have finished their main jobs for that cell.
- Place the emerged cell under the grow light the same day.
- Remove the dome or move late cells into a separate covered tray.
- Take the emerged cell off concentrated bottom heat unless the room is unusually cold.
- Keep the seed label with the cell before trays are rearranged.
- Check that drainage holes are open and empty standing water.
- Give the seedling a real dark period each night.
A mixed tray needs a split decision. Lift individual plugs or small cell inserts into the seedling area when possible, while unsprouted cells remain warm and lightly moist.
If the tray cannot be divided, uncover it and place the entire tray under light after the first substantial group emerges. Late seeds may germinate a little more slowly, but emerged plants no longer sit in a sealed chamber.
Do not tug off a seed coat that remains on the cotyledons. Moisten the shell, give it time to soften, and intervene only when it still traps the leaves after the tissue has hydrated.
The two rounded seed leaves are cotyledons. They are temporary food and light-capturing organs, while the pointed leaves that follow are the first true leaves.
Pepper seedlings from different cultivars often look alike. Record the cultivar, sowing date, and emergence date before moving plugs between trays.
Air movement should be gentle enough that leaves barely tremble. A fan aimed hard at tiny stems increases water loss and can cool the plug, while stagnant wet air gives damping-off fungi better conditions.
At this stage, the fastest useful inspection is a three-part check. Look at stem spacing, feel the plug weight, and inspect the stem where it meets the mix.
How much light and warmth do pepper seedlings need?
Pepper seedlings need a long bright day, moderate post-germination warmth, and darkness at night. Utah State University Extension recommends growing pepper transplants at 65 to 75°F and describes fluorescent tubes kept 2 to 3 inches above plants for 14 to 16 hours.
Those numbers are setup references rather than universal lamp instructions. A weak shop light may need to sit close, while a powerful horticultural LED can injure leaves at the same distance.
Use the plant to finish the adjustment. Compact internodes, level green leaves, and new growth centered beneath the fixture indicate that light is reaching the canopy without excessive heat.
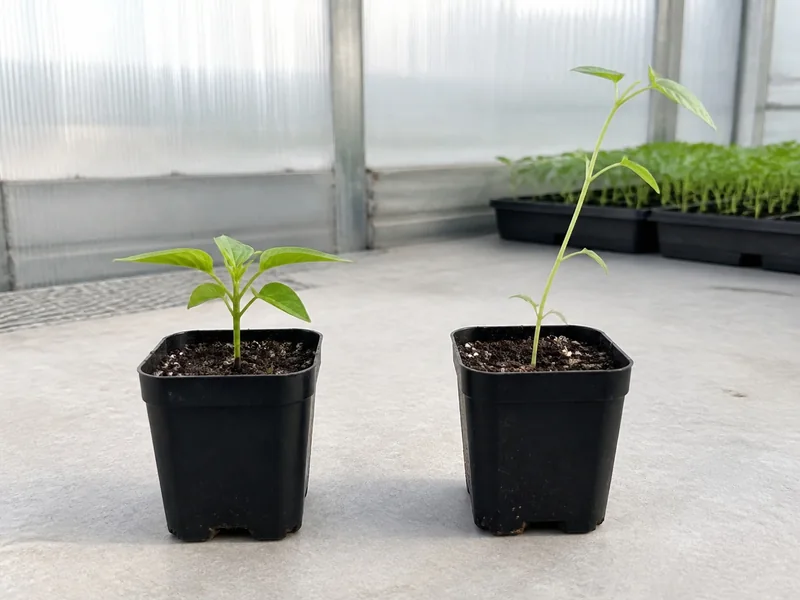
Long pale stems leaning toward the fixture show that the plant is reaching for more light. Lower or strengthen the light, center the tray beneath it, and separate crowded plants instead of burying a pepper stem deeply at the next pot-up.
Upward-cupped leaves, bleached patches, or a hot leaf surface point in the other direction. Raise or dim the fixture, increase air space, and confirm that the light is not heating a small enclosed shelf.
Rotate a tray when the fixture or nearby window lights one side more strongly. Rotation corrects uneven exposure, but it cannot replace an overhead source that covers the whole canopy.
A sunny window often produces a bright patch for only part of the day and changes with weather. University of Maryland Extension notes that windowsill light is frequently insufficient for sturdy vegetable seedlings, so judge the result from stem spacing rather than how bright the room feels.
Keep a timer on a consistent schedule and leave 8 to 10 hours of darkness.
Continuous light removes the normal night interval and is not a shortcut for a weak daytime setup.
After emergence, keeping the germination mat hot can combine fast stem growth with inadequate light. Remove concentrated bottom heat when room air already stays in the extension range, then use a thermometer at canopy height rather than relying on the thermostat across the room.
One compact seedling beside one stretched seedling is a useful control. Their internode spacing reveals a light difference sooner than leaf color alone.
How often should you water pepper seedlings?
Water pepper seedlings when the plug surface is nearly dry and the container feels lighter, then wet the root zone and drain it. A calendar cannot set the interval because cell size, mix, airflow, root growth, light, and room temperature change drying speed.
Check below the color of the surface. A pale crust can sit above a wet center, while a tiny cell beside the edge of a tray may dry before the cells in the middle.
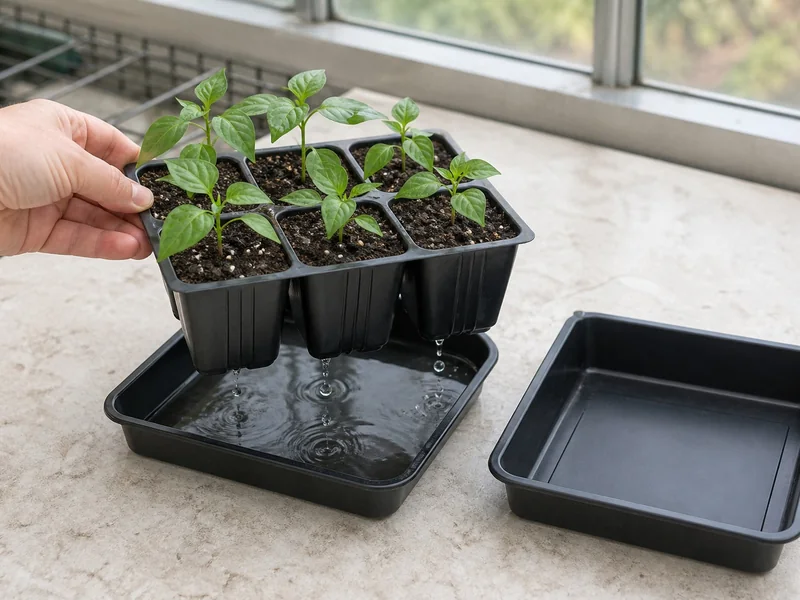
Bottom watering works when the tray receives a shallow layer of water long enough for the plugs to wick moisture upward. Remove the remaining water after the plug darkens and gains weight, so the roots return to a mix that contains both moisture and air.
Top watering also works when a fine stream reaches the whole plug without washing seedlings over. Misting only the surface can leave the lower root zone dry and encourages shallow moisture checks.
The cell is light, the mix pulls from the edge, and leaves lose firmness while the stem base stays clean. Water the full plug and recheck after it drains.
The cell stays heavy, algae or fungus grows on the surface, and leaves may yellow despite wet mix. Empty the tray, increase airflow, and let the surface approach dry before watering again.
The stem narrows, darkens, or collapses at the mix line. Remove the failed cell, isolate nearby seedlings, reduce saturation, and clean reused trays before the next sowing.
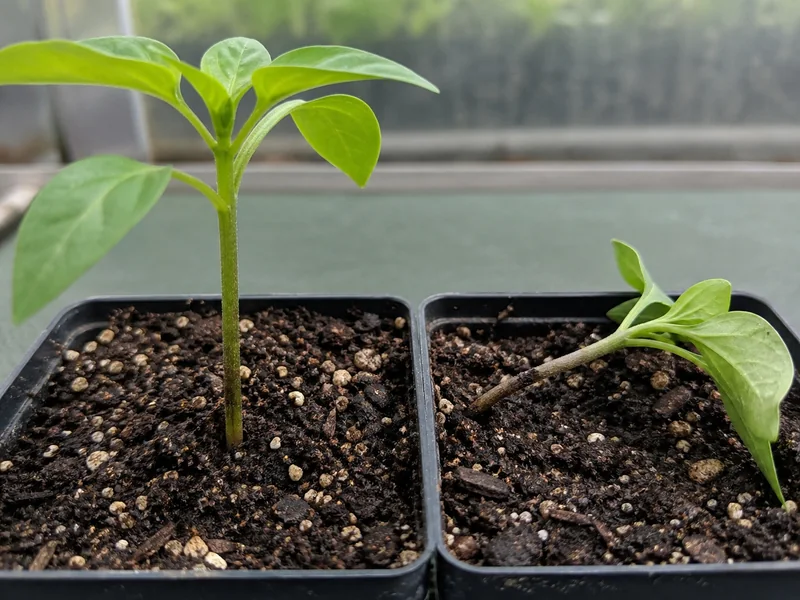
University of Maryland Extension identifies Pythium, Phytophthora, and Rhizoctonia among the organisms that can kill seedlings when media stays too wet. Extra water cannot rescue a stem that has already constricted at the soil line.
A seedling that wilts in wet mix needs diagnosis before another drink. Check whether the stem base is firm, whether drainage holes are open, and whether roots have been deprived of air.
A seedling that perks up soon after a thorough watering had a dry root zone.
Repeated daily collapse means the cell may be too small, the fixture may be too hot, or the mix may repel water instead of absorbing it evenly.
Ventilation reduces leaf wetness and evens drying, but it does not cure saturation inside a plug. Direct the fan across the growing area instead of blasting one row.
Water temperature should be close to room temperature. Very cold water can chill a small root volume, while hot water damages roots and changes how quickly the mix releases moisture.
Keep foliage and fallen seed coats off the mix when possible. Dead material plus a constantly wet surface gives fungi food and makes the stem line harder to inspect.
Do not compost diseased cell contents into seed-starting mix. Wash the tray, then disinfect it according to the product label before reuse.
As roots fill a cell, the same volume dries faster. A shorter watering interval can therefore be a pot-up signal rather than permission to leave water in the tray.
When should you thin, feed, pot up, and harden seedlings?
Advance a pepper seedling when the current cell, mix, or indoor environment no longer supports steady compact growth. Leaf count and calendar age can help, but roots, drying speed, crowding, and new growth give the stronger decision.
| Transition | Plant evidence | Action | Risk if done too early |
|---|---|---|---|
| Thin | First true leaves expand and seedlings compete in one cell | Keep one stem or separate extras while roots are small | Disturbing only cotyledon-stage seedlings can damage tiny roots |
| Feed | True leaves expand and the mix has little or depleted nutrition | Use a dilute complete fertilizer at the label rate for seedlings | Concentrated salts can burn tender roots |
| Pot up | Roots hold the plug, leaves overlap, or the cell dries unusually fast | Move into a modest larger pot with drained potting mix | A large wet pot can stay saturated around a small root system |
| Harden | The plant is sturdy, outdoor planting is near, and frost risk is ending | Increase outdoor light, wind, and time over about 10 days | Direct sun and wind can scorch or dehydrate indoor leaves |
Thin crowded cells after true leaves make the stronger plant easier to identify. Cut the unwanted stem at the mix line when keeping one plant, because pulling it can tear the roots of the seedling that remains.
If you want to save both plants, separate them while roots are still limited and the moist plug comes apart gently. Hold seedlings by a leaf rather than squeezing the stem, set each at its original depth, and water the new mix to settle it.
Fertilizer timing depends on the mix. University of Maryland Extension notes that many potting mixes contain enough fertilizer for five to six weeks, while a nutrient-free seed-starting mix may need a dilute complete feed after true leaves begin expanding.
Read the bag before feeding.
Yellow lower leaves can indicate depleted nutrition, but the same color appears when saturated roots cannot function, so correct water and drainage first when the plug stays wet.
Use a low concentration and observe the next growth. Brown tips, white crust on the mix, or sudden leaf-edge injury after feeding call for plain-water flushing and a lower dose, not another application.
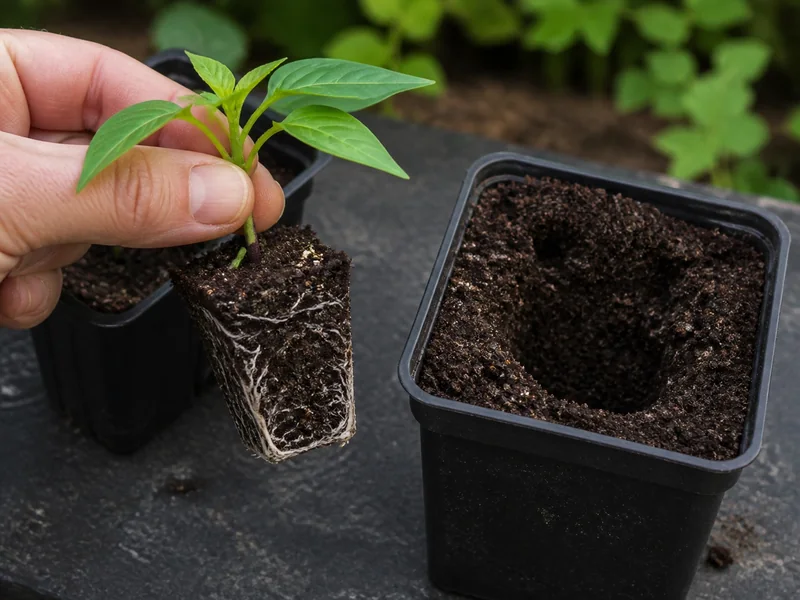
Pot up when roots knit the plug enough to lift without the mix falling away, when neighboring leaves overlap heavily, or when a properly watered cell dries much faster than it did the week before. These signals show that the root volume has become the limit.
Choose the next pot rather than the final container. A modest step gives roots fresh space while allowing the mix to dry predictably around the plant.
Fill the pot with drained potting mix, make a hole the size of the plug, and keep the pepper near its existing depth. University of Minnesota Extension cautions against burying leggy pepper seedlings deeply as a routine correction.
Water once to settle the mix, return the plant to moderate light, and wait for stable new growth before increasing fertilizer.
Temporary droop after root disturbance differs from a stem that remains pinched or dark at the soil line.
Hardening begins near the end of indoor seedling care, not after the plant is placed permanently in the garden. Penn State Extension recommends about 10 days of gradual exposure, beginning with filtered light and shelter from strong wind.
Increase outdoor time and direct sun in small steps, bring plants in for cold nights, and check the smaller pots more often because wind accelerates drying. Pause or step back after bleaching, severe wilt, or a cold forecast.
Peppers remain warm-season plants. Wait until frost danger has passed and soil is above about 60°F before the final move, while following the planting date and transplant instructions for the local climate.
A transplant-ready pepper is compact, actively growing, and rooted through its pot without circling into a hard mass. It has tolerated outdoor conditions for a full day and returns indoors or to shelter without collapse.